Data Layer in Google Analytics 4
Data layer is one of the most important concepts to grasp in web tracking, especially if you are working with Google Tag Manager. It is an invisible, virtual “container” or layer that temporarily stores important data points (product id, client id, information about a click element etc.).
Table of Contents
Don’t waste any more time – switch to GA4 now!
Day(s)
:
Hour(s)
:
Minute(s)
:
Second(s)
What is the Data layer?
In its technical definition, the data layer is a JavaScript array. And thus you can extract elements from the array and use them as firing triggers and variables that will help in tracking custom information on your website. In fact, Google Tag Manager heavily relies on the data layer to track certain custom events (like eCommerce tracking) and is the “source” that it depends on to read data points from your website and then send them to other tools like Facebook pixel, Google Ads, and Google Analytics. It is the “bread and butter” of GTM.
How does Google tag manager Data Layer work?

This is an example of a Google Tag manager container snippet that should be placed in the head of the source code to start tracking events. Notice in the snippet code, there is a data layer creation. Once you implement the Google Tag Manager container’s JavaScript snippet in the head of your website’s source code, the data layer will be automatically created. If however, your website already has a data layer, then the snippet code will adjust to it and use it.
How to insert data in the data layer?
So we talked about what is the data layer. You might ask, how is it used and where does this data come from, basically how is data pushed to the data layer ?
Remember the GTM container created an empty data layer. Therefore it needs to be filled with data that later on can be used by Google Tag manager in order to track custom events.
There are two ways that this can be done (the data layer will be filled with data that gets automatically tracked, however we will explain how to insert additional data).
Be careful
This requires technical knowledge in manipulating the source code of a website. Your web developer might not be familiar with what a data layer is. That is why it is best to collaborate in setting up the data layer. The developer handles the technical implementation of the events you want to track. However, if you feel comfortable handling the backend code of your website, you can proceed on your own.
1. Data Layer declaration
The first method is called a data layer declaration. With this method, you add the data layer before the GTM container snippet and it would look something like this:
So this method is very rarely used, and not recommended but we just wanted to also explain it clearly.
First, it is a very limited method, as it needs to be added above the GTM container. What it basically means is that you are defining a data layer where certain variables that Google Tag manager can then fetch, and transfer to Google Analytics 4 are already given when GTM is loaded. Imagine that you want to change certain variables that you have defined in the data layer, or update certain values if you re-implement it below the container, you will redefine the data layer as a new array and overwrite everything you have set up before. It can potentially break your entire tracking setup.
1. Data Layer declaration
The first method is called a data layer declaration. With this method, you add the data layer before the GTM container snippet and it would look something like this:

So this method is very rarely used, and not recommended but we just wanted to also explain it clearly.
First, it is a very limited method, as it needs to be added above the GTM container. What it basically means is that you are defining a data layer where certain variables that Google Tag manager can then fetch, and transfer to Google Analytics 4 are already given when GTM is loaded. Imagine that you want to change certain variables that you have defined in the data layer, or update certain values if you re-implement it below the container, you will redefine the data layer as a new array and overwrite everything you have set up before. It can potentially break your entire tracking setup.
2. Data Layer push method
The datalayer.push method allows you to add the data layer anywhere in the code (before or after the GTM container snippet) and it will not stop any of your tracking tags. And it would look something like this:
window.datalayer = window.dataLayer || [];
window.dataLayer.push ({})
This is just the statement in itself (like the one shown in the first method)
So you can see that with this method, the data layer is called first, and then a push request is added to push or add information into the existing data layer. Usually data or variables comes in “pairs” in the data layer. You have a variable key and a value for that key. Let’s check out the following example. Let’s say you want to track newsletter subscriptions. Form tracking method may not work on subscriptions, you might also catch the subscription with a click event, but you can also ask your developer to push this event to the data layer whenever it occurs on the website.
window.datalayer = window.dataLayer || [ ];
window.dataLayer.push ({
‘event ‘ : ‘ new_subscription_complete’
})
With this statement, the ‘event’ key is being pushed to the data layer, and the value of this key is ‘new_subscription_complete’. And then, this event can be used as a custom trigger (custom event trigger) to fire a tracking tag on that event.
eCommerce object and variables (purchase event example)
Usually, data layer is mostly used to track an eCommerce funnel. Google analytics does not automatically track eCommerce events, therefore events like add to cart, begin checkout, purchase are manually configured and pushed to the data layer. In this article we will not dive into the technical setup of an eCommerce object in the data layer, rather, we will show you what a “purchase” event might look like for example and how you can extract valuable information to use in Google Tag manager.
If you have already set up an eCommerce object in Universal Analytics (UA) you can still use it in setting up tags when migrating to Google Analytics 4. The eCommerce object structure is a bit different between the two analytics versions, however, as mentioned, the main topic of this article is to understand the data layer. So in our example, we will show what an eCommerce purchase event might look like in the data layer in UA and how to access the different variables.

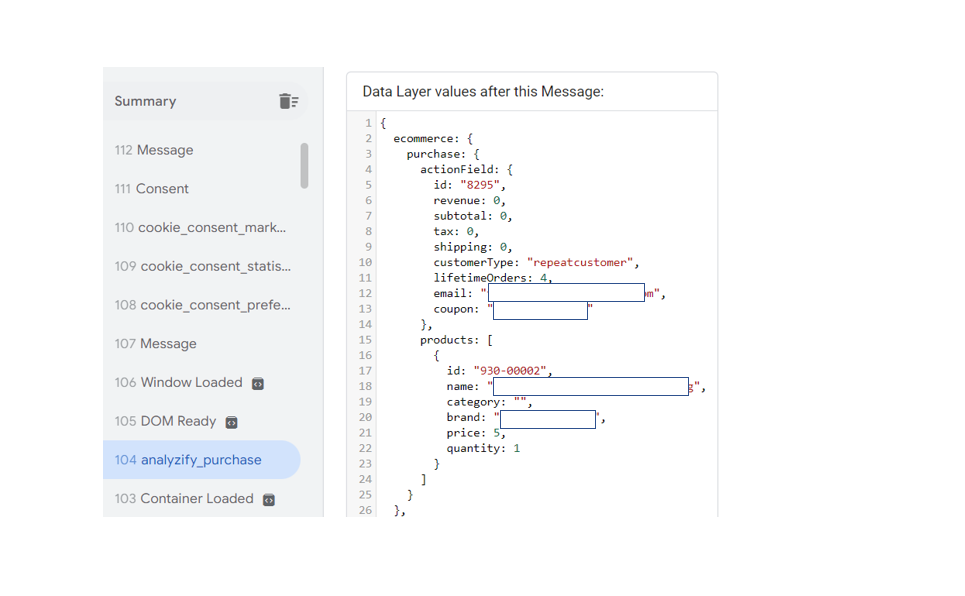
In Javascript, the {} designates an object. We can see that we have three “nested” objects, ecommerce, purchase, and actionField. Within those objects there are variables (remember that variables are defined in “pairs” meaning a key and a value) that are important to extract.
We also notice the “analyzify_purchase” event was pushed to the data layer. In order to first track the event, we need to set up a trigger that will fire a tracking tag. We can use it as a custom event trigger. Remember, the name of the event should exactly match the name of the pushed event.

Then, we set a tag that will fire under this condition (aka. When this event occurs). But, before we do that, let’s see how we can extract some of the important variables or “data” from the data layer and forward them to GA4.
As mentioned previously, when migrating to Google Analytics 4 you can still use the eCommerce data layer you set up in the previous version. Let’s say we want to get the transaction ID and save it in a variable. To access it, we need to access all three objects because it lies in the third one. So it will look like this, ecommerce.purchase.actionField.id As you notice, we “drill down” through objects with the “.” operator up until we reach the key we want. Let’s then go back to Google Tag manager and set this variable up.
We need to set a data layer variable configuration because that’s where we are extracting the data from.

You can probably guess by now how to get the other variables. ecommerce.purchase.actionField.revenue.xxx (xxx being the variable you want).
Other than the actionField object, we have the Products array (defined by [ ]) that contains an object itself. [ { } ]
To select the product array, select ecommerce.purchase.products

Now that we have set up all our variables, we go back to our initial tag we were setting up to track the purchase event.
The tag configuration will look something like this:

We forward all the event parameters to GA4. To finally make sure that all the variables are properly set up, head to the variables section in GTM preview mode and check whether they show correct results. As you can see below, the variables indeed show the exact same values as the variables in the data layer.

Closing Notes
The data layer is a very important concept to grasp when dealing with web tracking. The more you familiarize yourself with the data layer, the more useful you’ll find it. It may seem a bit difficult and too technical, however it is essential to understand. Once you know how to push data into the data layer, you will have much more flexibility in tracking very custom events that happen on your website. If you require any help or consultation in setting up Google Analytics 4, Google Tag manager, or configuring an entire data infrastructure for your business, we are one click away!


